It’s the younglings birthday this week, time to make a card.
I’d seen a cool saying “have a roar-some birthday” and a dinosaur seemed to fit the caption. (We do like our punny cards)
Having never drawn a dinosaur before I would need to do some homework.
A few black and white sketches to find a pose; almost used the bottom sketch, I quite liked it.
A roar-some dinosaur black & white sketch.
Then I found this guy, he looks a lot more cheerful, like he’s wishing someone a roar-some birthday hehehe.
roar-some dinosaur 1st sketch, a bit scrappy but a good start.
After looking at my sketch I realised there was something very wrong with the anatomy. Looking through our olde dinosaur encyclopedia and finding a photo of a t-Rex skeleton with a ropey illustration I worked out the problem and made a few more sketches of the offending parts and a new improved dinosaur was drawn.
roar-some dinosaur parts
The sketches were made on cartridge paper and the watercolour on cellulose watercolour paper which had some pro’s and cons, the paint moves differently, watercolour paper has more texture and the colours are a little brighter.
I used the texture to my advantage, rubbing gently over the top with a watercolour pencil gives an effect of scales. Dinosaurs are very big on scales.
It was lots of fun drawing something so totally different to normal and brushing up on my dino facts.
In my quest to draw better squirrels I now have many sketches and since I had some cards to make this week I’ve been putting my new found skills to work.
We all like to make each other cards for celebrations, they are fun to make and it always seems a little more personal.
Above a birthday card with a little squirrel reaching down for cake (as you do).
Below checking out the lay of the land on a tuft.
Squirrel on a tuft
I’ve been attempting simple backgrounds so they have places to live also they are not floating around on a white background.
I like the effect of the trees in the top image, they turned out much better than I thought they would.
The image below is a little over worked, less fiddling needed hehehe.
Some things I need to work on but on the whole they are OK.
Who knows, maybe some of this practice is paying off.
Thanks so much for taking the time to stop by. Till next time, have fun x
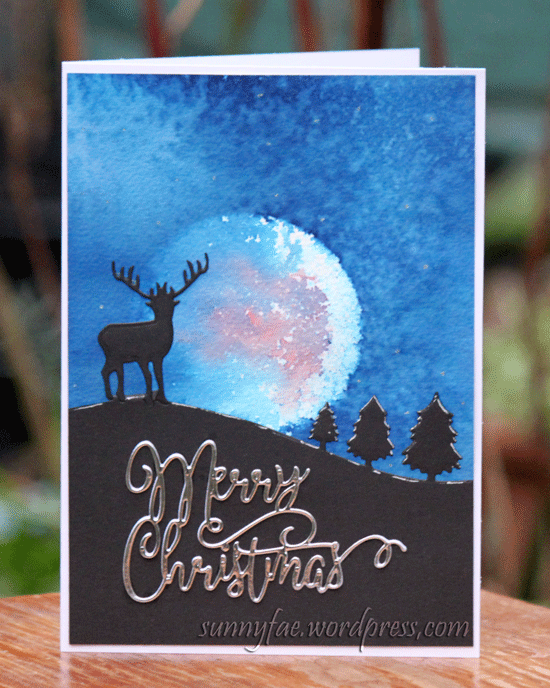
This little card was made out of one of the moon experiments I’d done in October. It’s very simple and hopefully effective, just a few die-cuts glued onto the front.
December has been a bit of a blur really. After a bout of COVID at the end of November and a short trip to London I contracted yet another nasty bug that has had me coughing and wheezing for weeks. This left me quite tired and Christmas preparations have been slow and steady as the energy allowed.
Now the time is upon us and I would like to send everyone best wishes for the season and a very happy Christmas filled with peace, love and joy.
Thanks so much for taking the time to stop by. Till next time, have fun x
This month there is a wedding anniversary and a birthday, a good excuse to paint some cards.
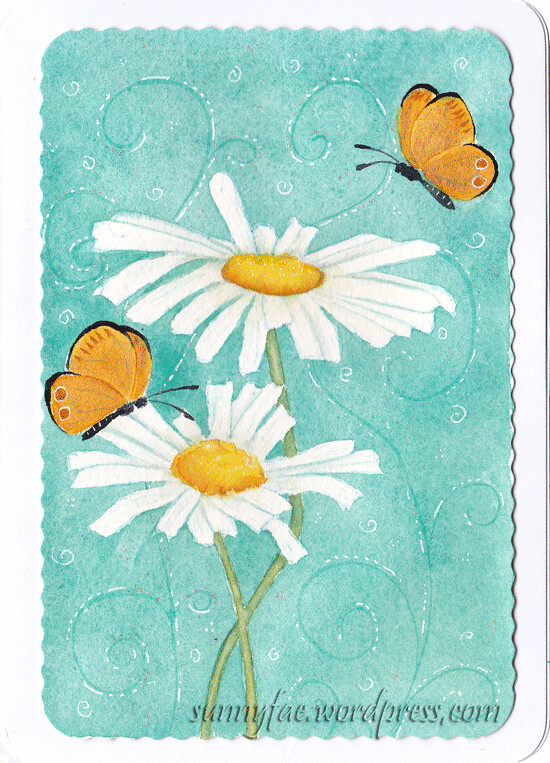
The first card, daisies and butterflies, painted on posh arches watercolour paper no less.
This was the second attempt as the sizing in the paper of the first attempt had degraded and to make matters worse the masking fluid I used, tinted blue left lots of blue stains on the paper!
The masking fluid is in the bin, I wont be buying that brand again.
In the end I just painted around the petals, I don’t think it looks too bad.
The butterflies have gold shiny mica watercolour on the wings and the background looked a little empty so I painted blue swirls and drew around the swirls with a white and a sparkly gel pen.
Below is an image of me trying to take a photo of the sparkle, Can’t see it? No me neither phfftt. Obviously my photographic skill are not good enough for the job.
Sparkly daisy card
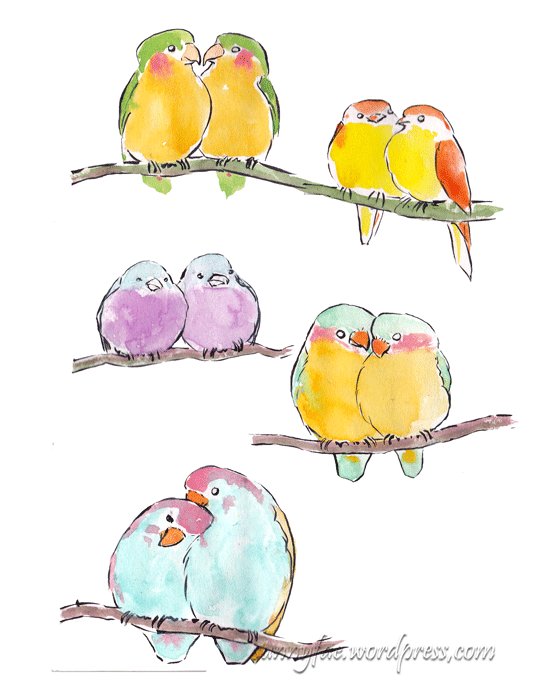
It’s our anniversary in august so I like to make himself something a little romantical. I went with love birds and drew lots of scrappy little birds in the sketchbook. These are the best of the bunch.
Birb sketches
I picked the two second from the bottom and added some cherry blossoms to give them more of a branch to sit on.
Love birds in the cherry blossom.
Thirty seven years, crikey! Seems like yesterday. Doesn’t time fly when your having fun.
Thanks so much for taking the time to stop by. till next time, have fun
I have made a few cards recently, for various occasions. These are the few I remembered to take pictures of as most of the time I forget until I’ve given it away.
(above) A Fathers day painted with watercolour and brush pen. Some little frogs sitting on a log. The background is actually a bit more green than this image shows. I like the expression on their faces they make me smile.
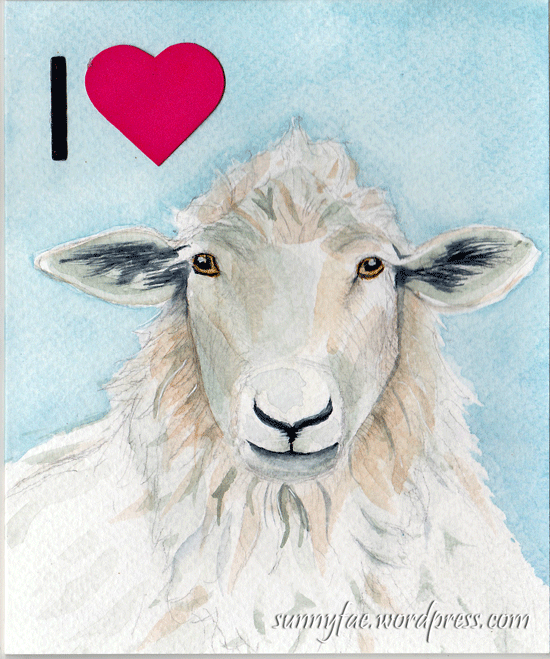
I love ewe. I like a play on words and so does the other half. I used three colours to paint it, burnt sienna, cerulean blue and paynes grey. Interesting how many colours it takes to paint a white sheep.
This was made for our wedding anniversary (36 years!) time goes by so quickly.
Sheep card, I love ewe.
Three brown mice. This was an idea from my Inktober drawings you can see it here. The background was Moonglow by Daniel Smith, it splits and divides into various colours of purple and mauve. I think I also splashed a little water over the top for some added texture. It’s interesting but I’m not sure it’s the best colour for a background.
Three brown mice
Jellyfishes. Li Ching Heng makes some very good tutorials on instagram, I loved all of the tiny fish plants and details she had used in this one and I really wanted to try it.
I used some shiny mica paints on the jellyfish and some of the plants so it is quite sparkly in places. loved the way it turned out and once it was finished I thought it would make a nice card.
A jellyfish birthday card.
I like sending my little artworks out into the world and maybe they bring a little pleasure into someone’s day.
Thanks so much for taking the time to stop by. Till next time, have fun
I wanted to make a Fathers Day card for the illustrious other half this week. After some consideration I decided I would try and paint an owl, in watercolour so first things first I spent a few days researching and sketching owls in my sketchbook.
I tried some whole owls or as near as I could with the images I’d chosen and drew them lightly in pencil.I then put all of the dark areas with a brush pen. I coloured them quickly in watercolour, testing which colours would work.
A sketch of a great horned owlAnother sketch of a great horned owl. I liked this owl but whoa! the colours were all wrong. Still not quite there yet.
I also wanted to try concentrating on just the head and found it created a quite a nice shape on the page plus it still allow for a decent amount of detail.
Owl idea sketch. I like the profile of this one.
In the end this was the one I liked best but wasn’t happy with the colours, the burnt sienna was too red and the eye too orange.
Practice owl for the card. This is the owl chosen for the card.
The colours I used for the watercolour painting were raw sienna, quin yellow with a few flecks of quin burnt orange for the eyes, paynes grey and sepia for all of the dark plumage. I’ve written them down here to remember them, these are not colours I use a lot and I’m sure to forget.
You can see the finished card at the top of the post. I think it turns out OK and more importantly the other half really liked it.
There’s a good chance some of these owls may end up on other
cards I make during the year and now the hard work is all done it shouldn’t
take too long to do.
Happy Fathers Day people.
Thanks for taking the time to stop by. Till next time, have
fun x
This week I have been drawing orchids, lots of orchids. We have two orchid plants in our house, mine is the pink striped one and the other is white with slightly bigger flowers belonging to my daughter. We are extremely happy with ourselves because amazingly they are still alive after over a year, whoot!
The pink one started to flower last week and I drew one or two sketches of it. This week the white orchid is flowering, it has grown four flower spikes so far so there will be lots of drawing opportunities available in the future.
The drawing above and the one directly below were both drawn with a fountain pen and brown ink, the ink was then brushed out with a water brush to create the shadows. I really like the way the tones and shadows stand out on the first one,
A drawing of a white orchid in brown ink. I love the colour of this ink.
The next two are drawn the way I usually draw things in general, with a pentel brush pen. I know it makes them look a bit cartoon-y but I like the effect. I also wanted to use these drawings as a pattern for watercolour and thought it would show better though the light box and paper. It did.
A sketch of white orchid flower buds
The shadows didn’t show up too well on the scan of the flowers, to be honest I’m not sure they were strong enough to start with, something for me to experiment with later.
A sketch of a white orchid spray.
I painted a green background on this one trying to push the white flowers forward, I had wanted to try to paint it without the heavy lines but the shadows again were not strong enough. This is all useful information to take into future drawings.
Some white orchids on a green background
This one was more an experiment with the paper than the drawing. I like the effect of the blue background and I will try this again. The paint was applied with a 1” synthetic brush in a criss-cross pattern.
white orchid on a blue crisscross blue background
All of these drawings were done in my sketch book which contains a coated cartridge paper so an even wash is not possible. It turned out quite well and isn’t any where near as much work as the green background in the image above.
This quick sketch was drawn on brown packing paper, I wanted a toned surface and this was all I had. It’s drawn with a fountain pen and brown ink then painted with watercolour (Chinese white for the petals)
An orchid sketched on brown paper
Finally watercolour paper (phew!) This is always fascinating to me, the water was added and the paint allowed to travel out along the water.
I like the colour and the way this turned out, again the shadows are not strong enough. I could have fixed it maybe but the next day it had been made into a birthday card and was winging its way to its new home.
Its recipient said she liked it and that’s what really matters.
Blue orchid birthday card
I love playing and working in my sketchbook, It’s nice to make pretty pictures but my sketchbook is the place I experiment, make mistakes, learn from the things that worked as well as the things that didn’t. If all my drawings were perfect there would be no need to practice and for me that is where the fun lies.
Thanks for taking the time to stop by today. Till next time, have fun x
‘Tis the season so they say, which means Christmas crafting begins in earnest. I know most sensible people sort this stuff out way back in August, but I just never seem to get round to it that early.
December always creeps up on me, I turn around and Pow, there it is and I’m not ready!
I have too much stuff so I’m trying to use up only things I already have this year.
I don’t have any two-sided origami paper but I managed to find a couple of red envelopes that were white on the inside. The tutorial doesn’t give a size for the little squares, they’re really tiny so I experimented and decided 1 ½ inches was about the right size.
I made a simple patterned paper on the computer with little baubles and streamers (something chrismassy) and used it for both the tags and the cards further down.
I don’t put ribbons through the tags till I wrap the gifts so I can use something that matches the paper I use.
Detailed picture of the origami santa tags
I was given a lot of odd shaped card bases a few years ago (6 ¾” x 3″) so I decided to use these up this year.
Most of the cards I made this year are simple, die-cut, as near to one layer as I can get, they needed to be quick to make and easy to post.
just a few of the die-cut Christmas tree cards made this year,they were all slightly different
The cards were narrow enough that I could place the whole card flat on the plate and cut the tree directly out of the card base; I backed each tree hole with a coloured paper (cream, green or gold) and glued the trees back into the hole. Then it’s just ribbons sentiments and snowflakes, bang, job done.
Last but not least I finally painted some Christmas cards whoot! The winter scene I painted last week made a very nice card, I added a small amount of glitter with a sparkly pen to make it a little more festive.
Watercolour Santa gnome and snow-scene cards
This week I wanted to draw/paint a gnome, (no idea why?) I roughed him out in my sketchbook a little to decide how he was going to look then painted him with watercolour on watercolour paper.
I like him, even if he does look more like Santa on his day off than a gnome. He certainly looks OK on a Christmas card.
So that’s the cards written out, the tags sorted and were not even half way through the month yet! oh so organised hehehe.
Thanks for taking the time to stop by today. Till next time, have fun x
 A roar-some dinosaur card front